Microservices Architecture on Docker

With
increasing business demands, we now develop very large and complex projects
that take more time to build and deploy. Whenever QA reports any issue, we need
to debug or fix it and then deploy the whole code. To reduce these
complexities, most organizations are moving towards Microservices
development and Docker for easy deployment and smooth
service running.
This
article on microservices is focused on what “Microservices” are and their advantages over monolithic
services architecture. A Step by Step procedure to develop Microservices
using .Net Core 2.2 framework with C# and Docker. Use
Visual Studio 2019 Preview as the IDE.
Agenda
to cover this article:
- What are the lists of software required for Windows?
- Why should we use Microservices
instead of a monolithic approach?
- Why should we use .NET Core?
- Why should we use Docker?
- How to create Microservices
using .NET Core 2.2 with C#?
- How to build, tag and run the Microservices
using Docker Container under multiple
environments?
What Are the Lists of Software Required
for Windows?
- Visual Studio 2019 preview.
- .NET Core SDK 2.x (on the current article we have used
version — 2.2).
- The stable version of “Docker
for Windows” (for development we have used Linux OS), Make sure Hyper-V
should be configured and enabled on your local machine for virtualization
as development purpose.
- Docker Tools (Kitematic).
- Swagger or Postman client tool to test API (services).
- Non-Relational Database – Cloud SQL as PostgreSQL 11.0 [in case required].
Why Should We Use Microservices
Instead of a Monolithic Approach?
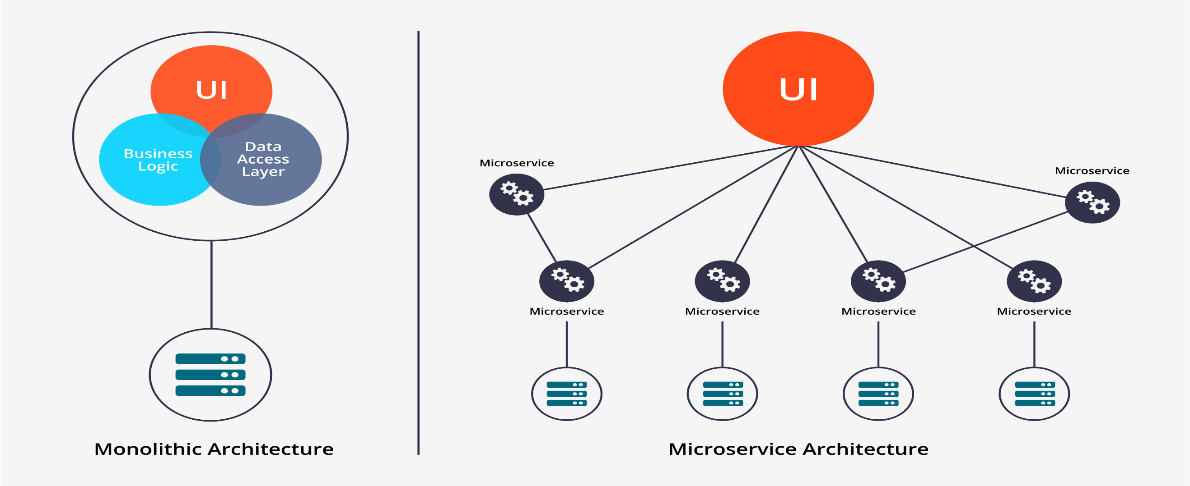
- Microservice is an approach to develop small services that run each
in its own process. We should develop micro-services instead of one
service (a monolithic approach) because of its loosely coupled nature.
- Microservices are independent services directly calling their own
database. Whereas in monolithic architecture, the database remains the
same for all the functionalities.
- Cleaner code, Easy to Maintain, Unit test and Code
reuse.
- Below is a diagrammatical difference explanation:
Why Should We Use .Net Core?
- It’s open-source and is very helpful in developing
high-performance and scalable systems.
- It supports cross-platform runtime.
- .NET Core is also helpful for faster development, as
well as supporting built-in dependency injection and a cloud-based
environment configuration.
- .NET Core also has Docker
support.
Why Should We Use Docker?
- Docker is a tool that makes it easier to create, deploy, and
run applications by using a containerization approach. It is lightweight
in nature and takes less time to start than traditional servers.
- It also helps to increase performance and
cost-effective.
- You no longer need to pre-allocate RAM to each
container.
How to Create Microservices
Using .Net Core 2.2 With C# and Then Build and Run It
Using Docker?
To start with the creation of micro-service we have
implemented the Repository Design Pattern. You can go for both Multiple
Repositories pattern and then capsule it in a Unit of Work pattern, just to
avoid the complexity of code standards.
Data
access logic is in a separate class, or sets of classes called a repository,
with the responsibility of persisting the application’s business model.
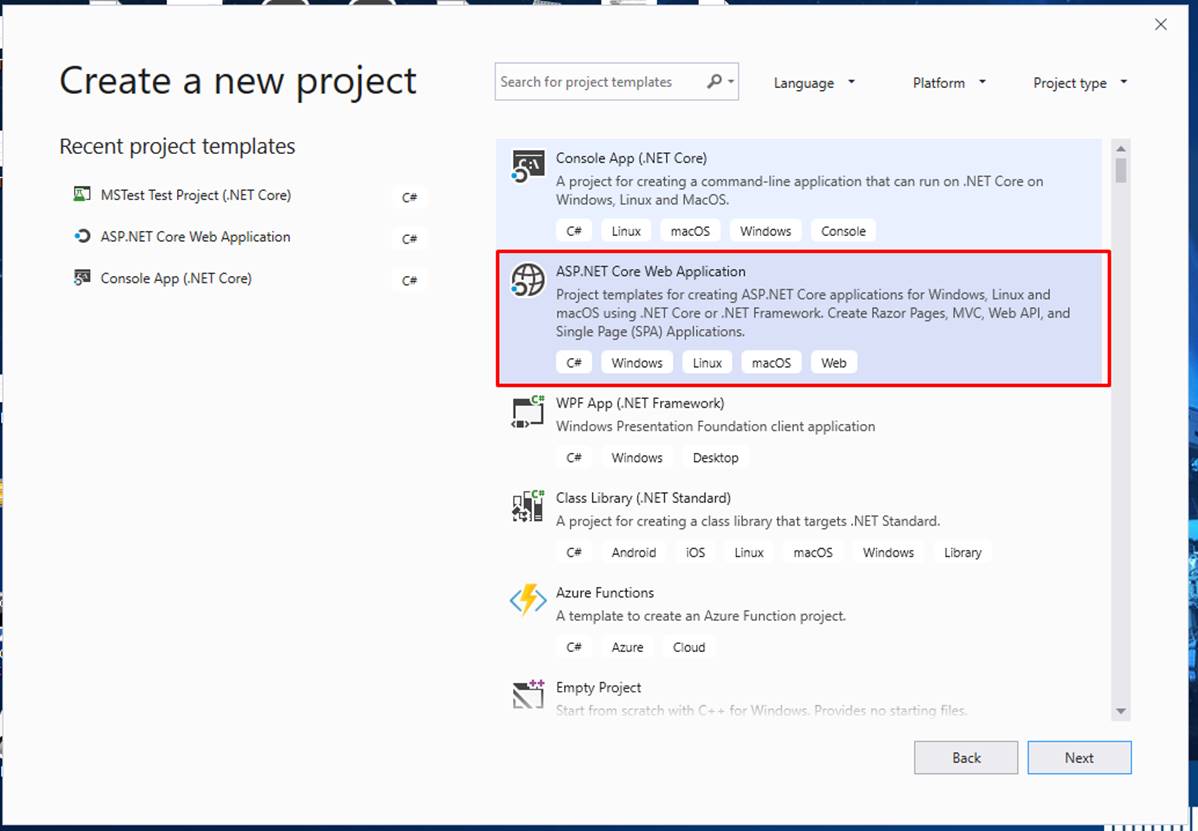
Step One
Open
the Visual Studio IDE and create a new web application project. Select “ASP.NET
Core Web Application” as the project framework template i.e. DotNet Core 2.x, which supports cross-platform with C#
language.
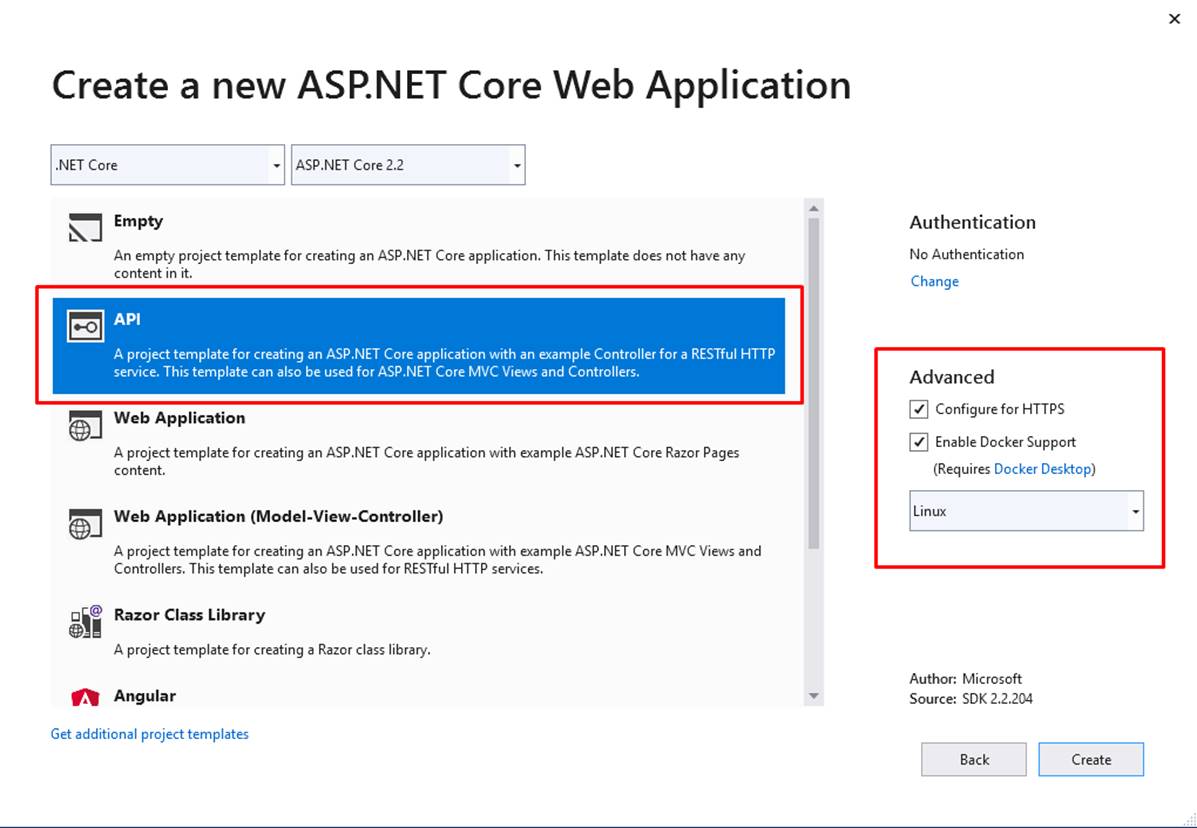
Step Two
Select
the “API” option and in the Advance section select “Enable Docker
Support”, “Configure for HTTPS” with no Authentication which will create
respective files and docker files into the project.
Why
we selected API is because we have to create Restful HTTP service with
Controllers example. This template helps to create micro-service in general.
No-Authentication by default, because we are going to create API
services, so not required.
Enable
Docker Support is
to create Docker files, this Docker
file will help to create images and then later containerize in the cloud.
Currently, we have chosen LINUX as a targeted Docker OS.
Configure
HTTPS is to expose the API service
as HTTPS secured layer, TLS/SSL configuration required whenever we want to
deploy in the actual PROD environment.
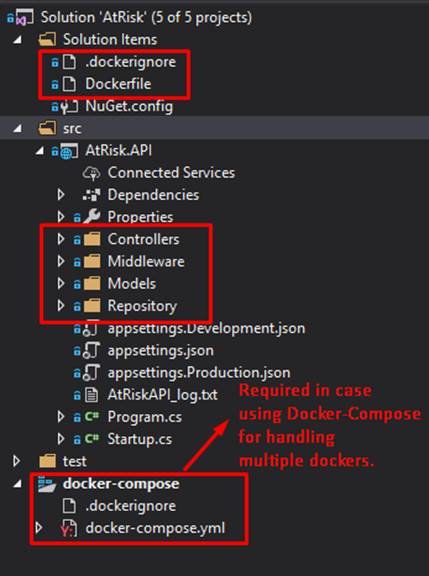
Step Three
Respective
folders will get created by the help of templates chosen, Then manually create
new folders as “Models” and “Repository” for dbContext
object as database connectivity.
So,
the above steps mentioned are the basic generic way of creating and start
working on micro-services. On later steps we will concentrate on each folder
and their significance of code-snippets. As an example, I will display one of
my micro-service “At-Risk” and expose as an API service. Like-wise we have
created several such API services and exposed them based on our business
requirement.
Step Four
Development
is divided into the below sections:
- Creating Models
- Context Class
- Setting Up Database Connection
- Repository Design
Pattern Logic.
- Dependency Injection of Repository.
- Implementation in Controller.
- Run the Microservice
(Postman, Swagger, IIS express).
- Creating Docker File, Image
and run the containerized service.
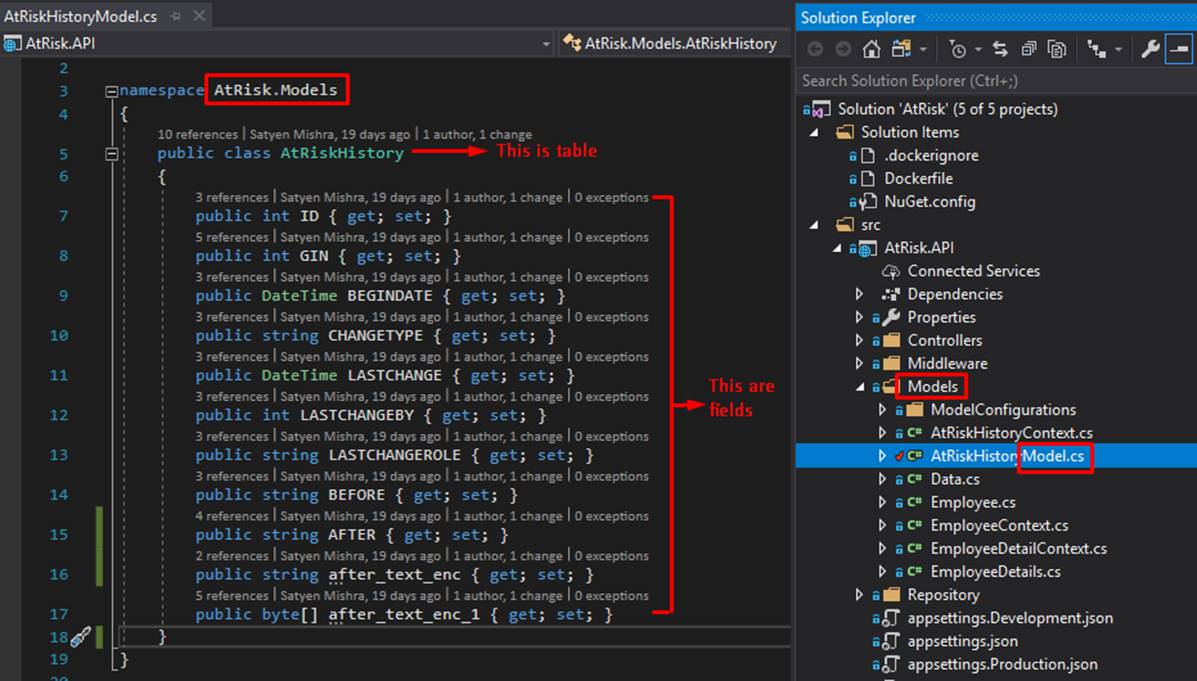
Creating Models
Model
classes represent the Tables and fields inside the database and will serve to
map the data from the database. We have created the “Models” folder. Create a
New class “AtRiskHistory” into Models folder and
create properties that will map with Database table columns.
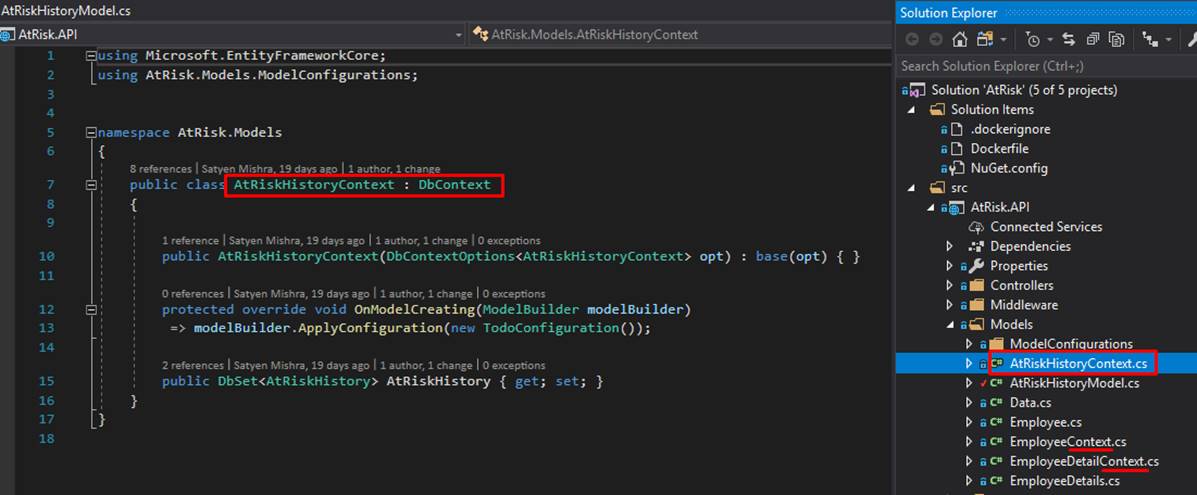
Context Class and the Database
Connection
Now,
let us create the context class, which will be a middleware component for the
communication with the database. It has DbSet properties that contain the
Table’s data from the database.
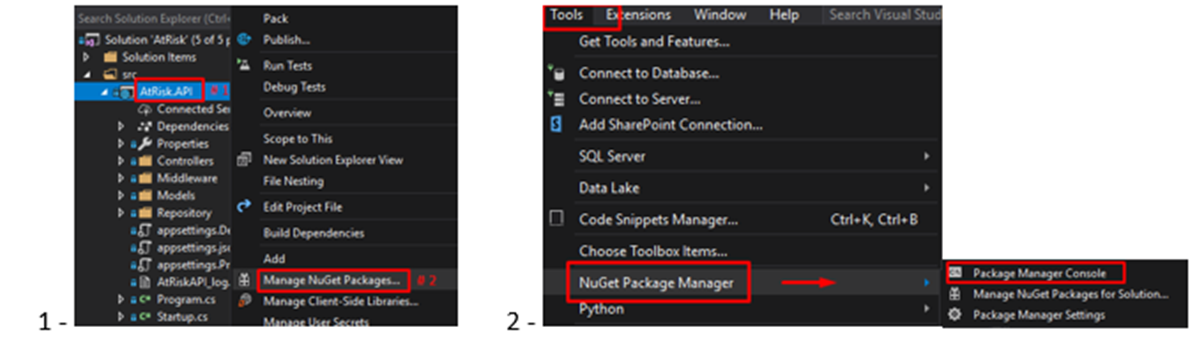
To
enable communication between the .NET core and the PostgreSQL
database, we need to install a third-party library. In the main project,
install it either through the
1) Project > Manage NuGet
Packages or 2) Tools > NuGet
Package Manager > Package Manager Console, as shown below:
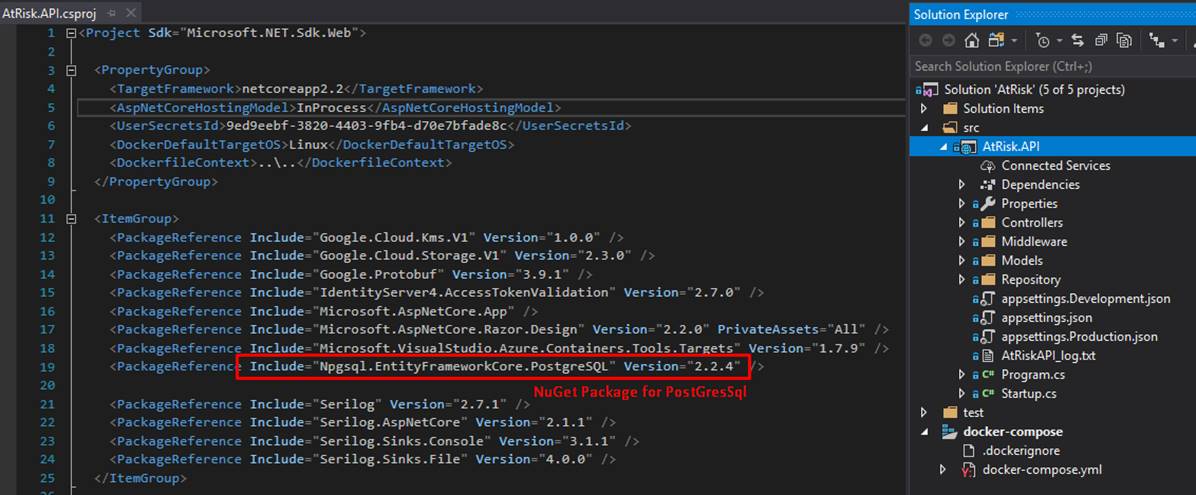
Below
is the output of packages installed viewed at .csproj
file:
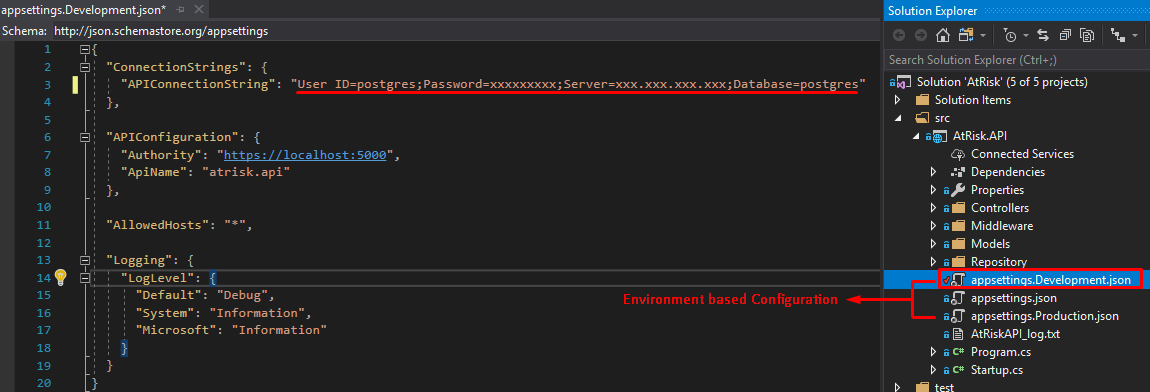
Setting Up
Database Connection
Open
the appsettings.<Environment>.json file and add DB connection
settings. Ideally, we should use the Environment Variable Configuration
approach. This is easy to maintain and deploy. In this example when you are
dealing with Development environment approach for appsettings.Development.json.
Repository Design Pattern Logic
[We
have skipped the Unit of Work DP]
Create
the generic repository that will serve us all the CRUD operations
with SaveCommitAll method (Ideally, the SaveCommitAll
should be achieved by Unit of Work Design Pattern as a best practice).
Now
all the methods will be invoked by any repository class in your project and in
any Controller class, we can invoke the repository logic. To build the logic
first, let’s create an “Interface” for the repository inside the Repository
folder. Right after the Interface creation, we will create a new Class into the
Repository folder. We use Inheritance and then inherit the Repository Class
with the IRepository interface. We write our business
logic into the Repository class.
Create
a new Interface IAtRiskHistoryRepo and define a method GetAtRiskEmployeeDetailsAsync

Create
a new class AtRiskHistoryRepo into the Repository folder which will implement IAtRiskHistoryRepoInterface.
Then write business logic for GetAtRiskEmployeeDetailsAsync method.
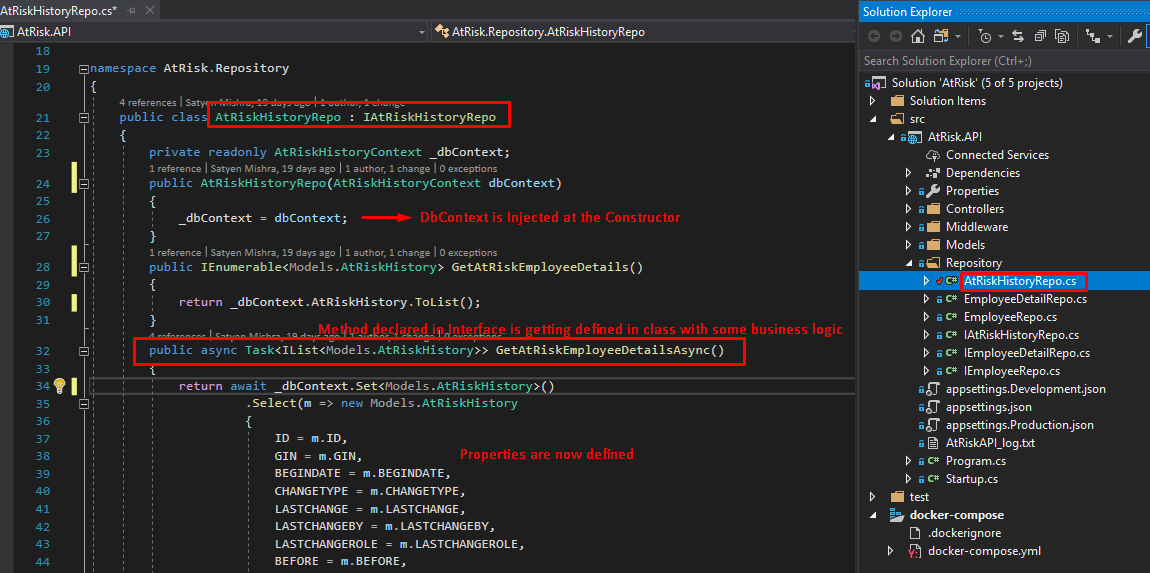
Note:
Repository works as a micro component of micro-service that encapsulates the
data access layer and helps in data persistence and testability as well.
Dependency Injection for Repository
We
know .Net Core supports built-in dependency injection and cloud-based
environment configuration, so keeping this in mind lets add Dependency
Injection of Repository Class and Interface into .Net core projects.
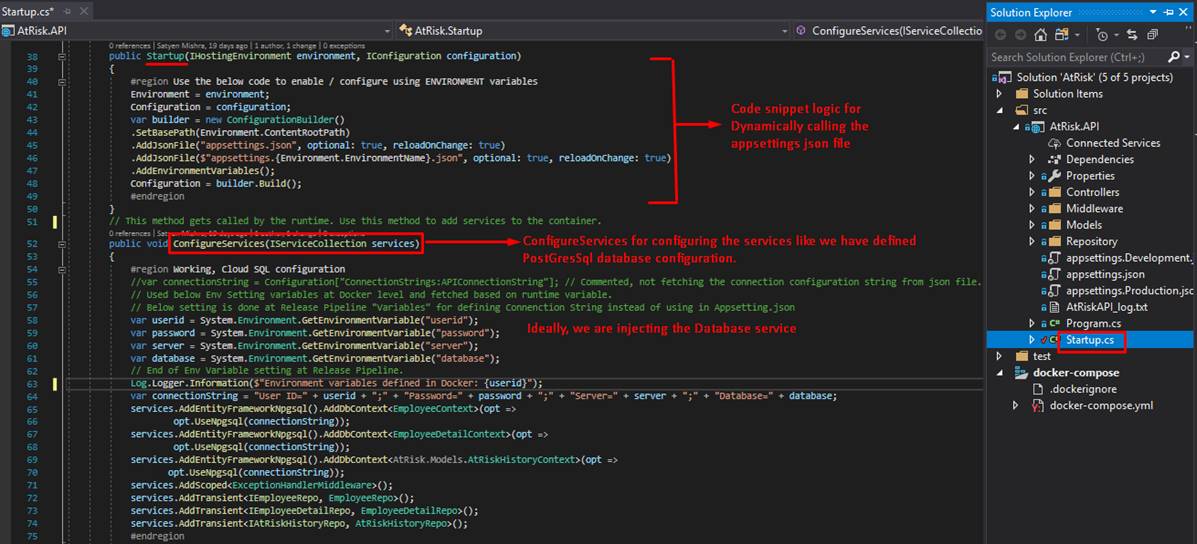
Open
the StartUp.cs file and add the code i.e. to inject the service as
like:
services.AddTransient<IAtRiskHistoryRepo, AtRiskHistoryRepo>(); etc...
and few PostgreSQL configuration’s snippets inside the ConfigureService method so that the repository’s dependency is resolved
at run time when needed and establish PostgreSQL DB
Connection.
If
you see, in StartUp class we have no were mentioned
any sensitive data, everything is environment variable configuration based like
used for DB connection. Always keep this best practice to not mention any
sensitive or secrets in code solution when dealing with the PROD environment.
Implementation in Controller
The
Microservice should have an endpoint for which a
controller is needed, which exposes the HTTP methods to the client as endpoints
of the service methods. So, Implement the IRepository
interface into the controller class.
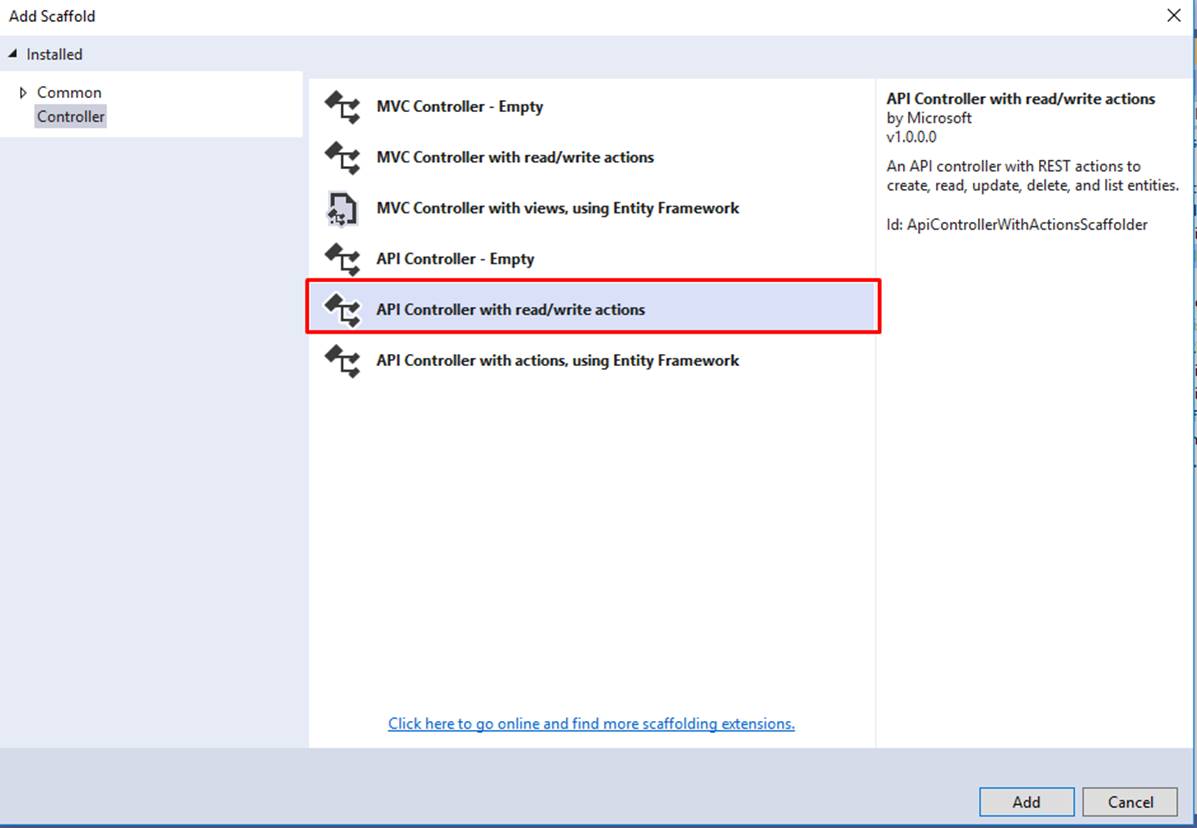
Right-click
on the Controllers folder and add a new Controller “history” to get the At-Risk
history details.
Add
below code to call the GetAtRiskEmployeeDetailsAsync method.
The basic implementation is shown here for the sake of understanding the
concept. The methods could be attribute routed and could be decorated with more
annotations as needed.

Note: We
haven’t used the Entity Framework Core
Migrations because this was a
database-first approach.
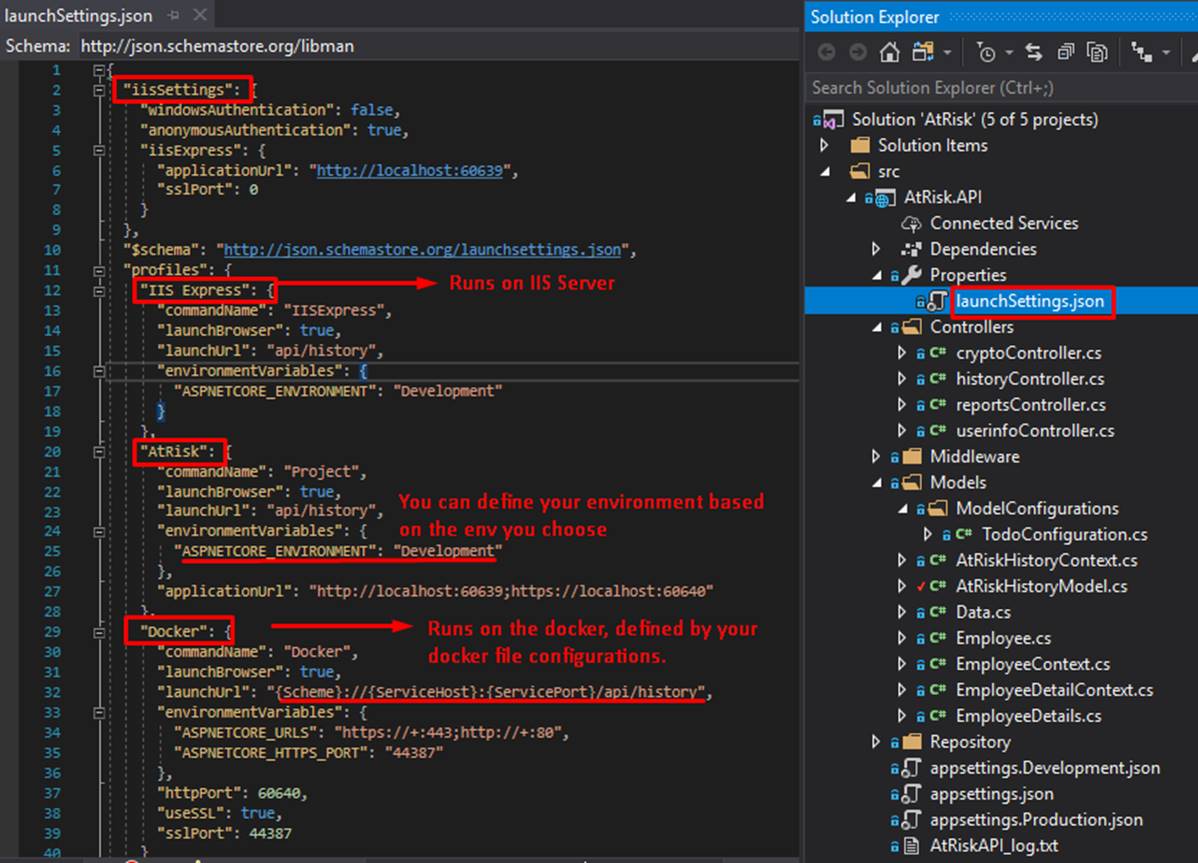
Run the Microservice
Click
on the launchSettings.json file for setting the service to get executed, next
click F5. The service could be run via IIS Express. For example, Visual Studio
default or via Docker container as well. Below are
the default setup is shown, however, you can modify as per your requirements.
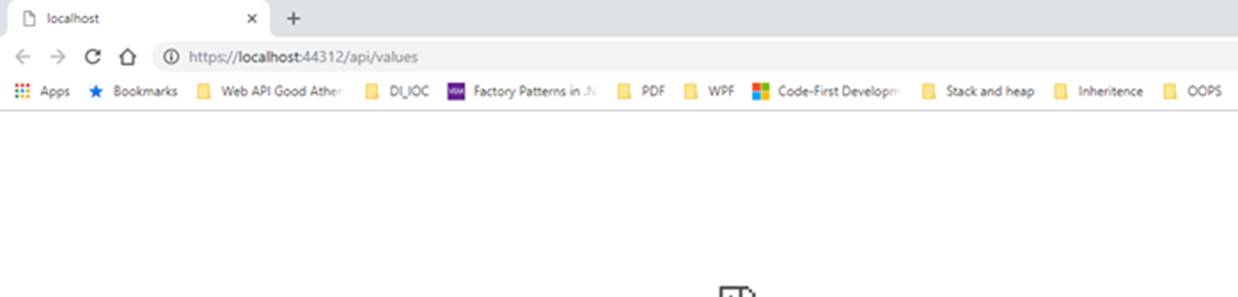
Sometime
it might not show any data while running in a browser, it will be blank, but
the service could be tested via any API testing client. Here Postman is used to
testing the service endpoints. Keep it opened and the application running.
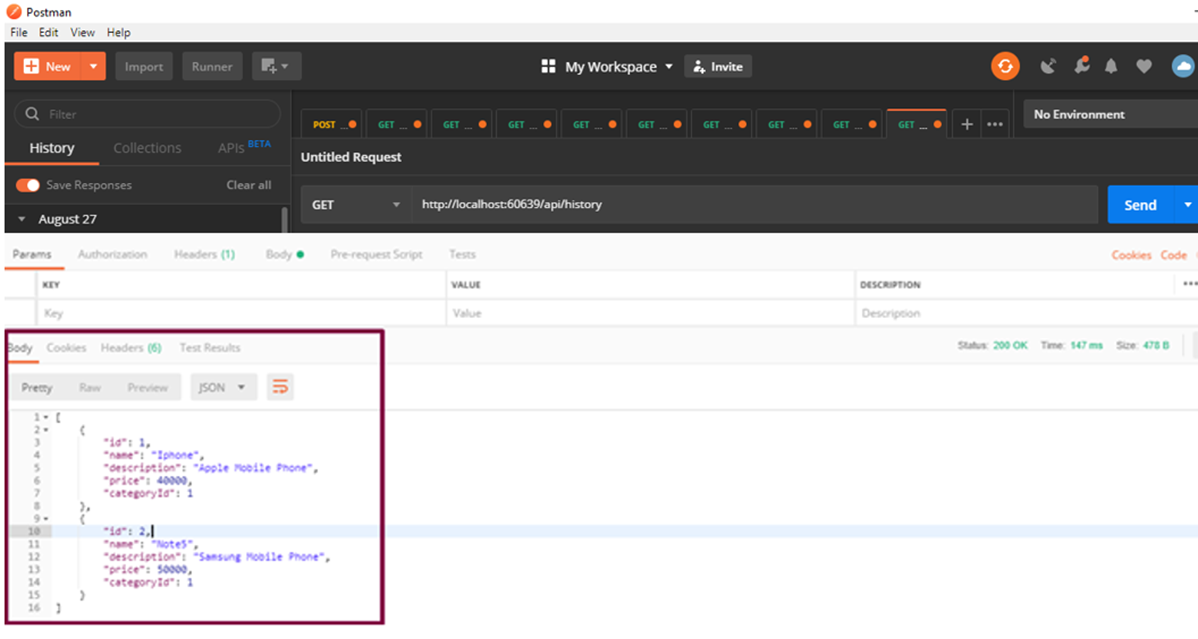
Through
Postman, perform a GET request now and two records are shown as a JSON result response.
Creating Docker
File, Image and Run the Containerized Service
To create a Docker
file, refer to the initial step two of this article which explains how to
select Linux as Docker Target OS at the beginning of
the project creation.
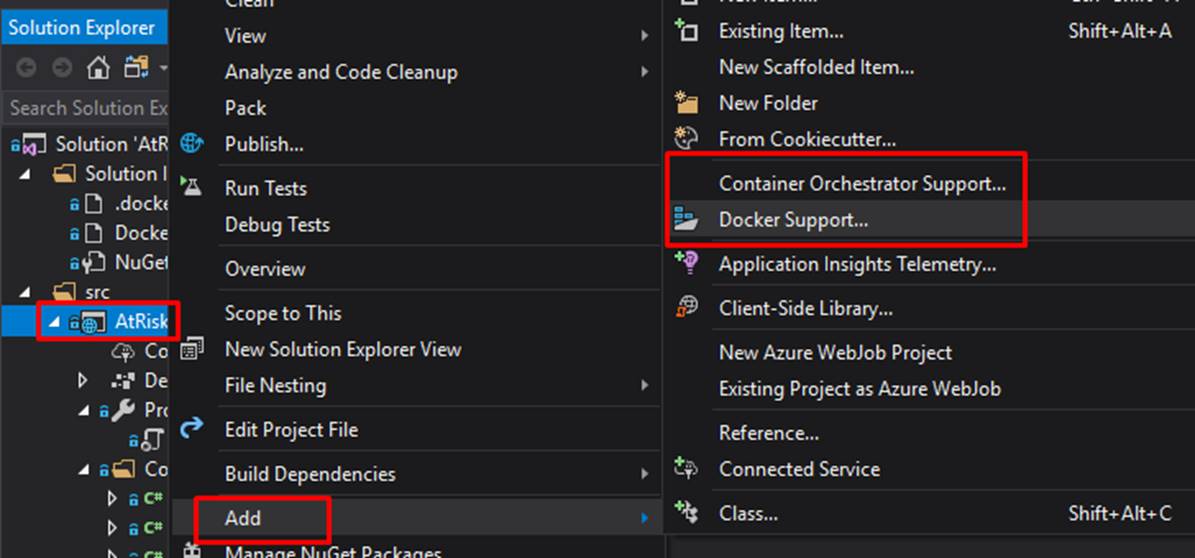
OR
to create later, Right Click on the cs project > Add > Docker Support.
You
can use Docker-Compose in case you are dealing with
multiple Docker files. Docker-Compose
makes easy to build and run the multiple Docker files
on a single go.
To
use Docker Compose, Right-click on cs project > Add > Container Orchestrator Support > Select Docker-Composefrom
dropdown.
Note:
The idea behind the article is to have a simple approach to Dockers, and
just deploy and execute the service through Docker
Container. I would suggest to separately deep dive more in Docker, Containers and Docker-Compose
through their official sites.
If
we select Docker Support to create Docker files the next screen would display Target OS:
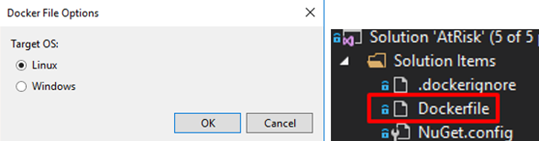
If
we select Container Orchestrator Support to create Docker-Compose
File then the next screen would be:

For
this example, we will skip Docker-Compose and only
create a Docker file to run and deploy the services.
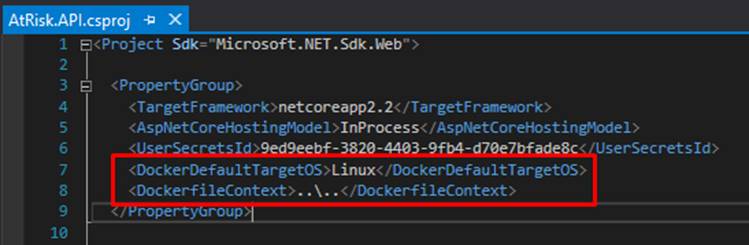
Once the Docker file is created the same will get
appended in .csproj file as below:
DockerFileContext defines
the relative path of the docker file placed.
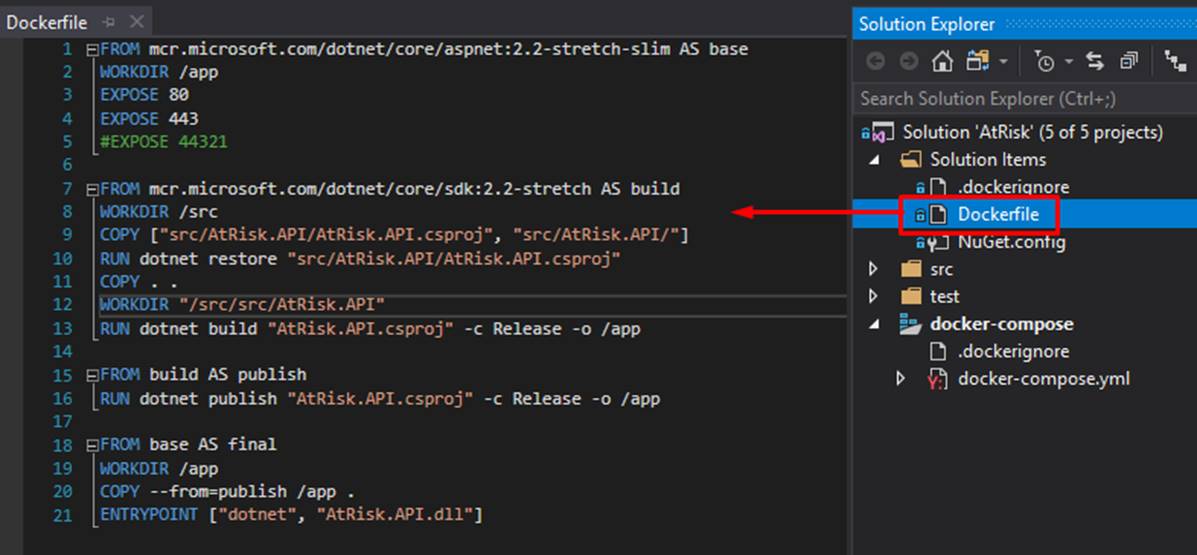
Docker
file sample:
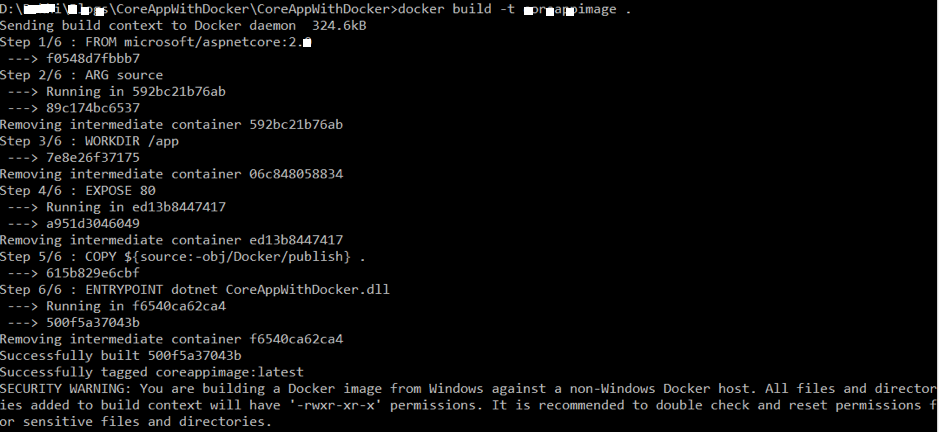
How to Build, Tag and Run the Microservices Using Docker
Container Under Multiple Environments?
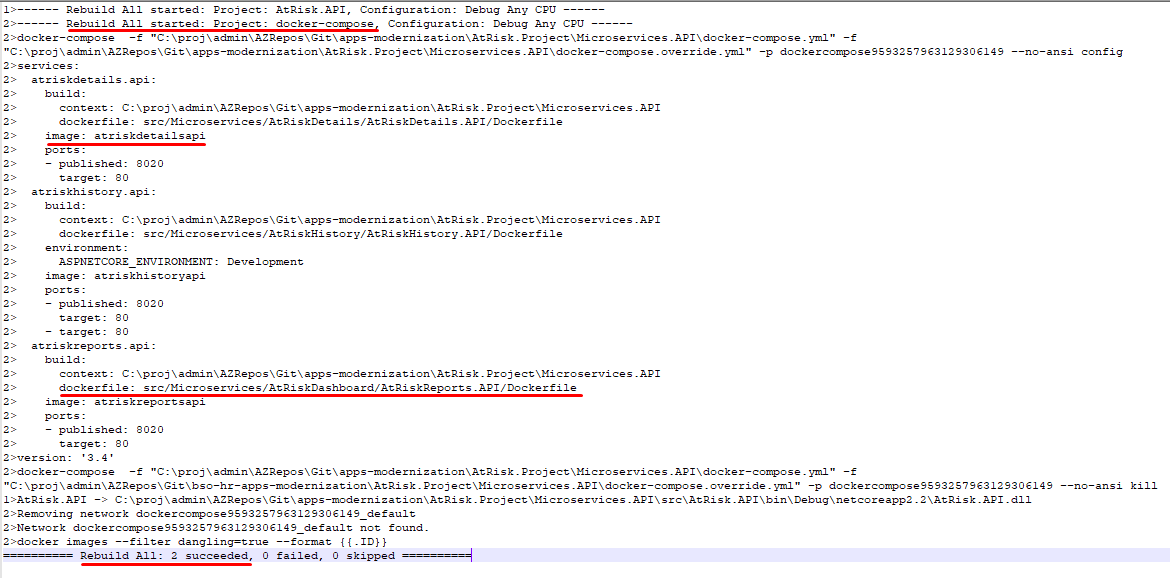
Running the service could be done via Docker commands to be run in a Docker
command prompt and using Visual Studio as well. As soon as the solution is saved,
it builds the project under the container and creates a Docker
image. All the commands execution can be seen in the output window when the
solution is saved.
Open
the command prompt in admin mode and navigate to the same folder where the
project files are.
In
case you want to test the containers in the localhost
then run the Docker commands.
The
same commands will be used while running for a PROD environment with slight
tweaks.
docker images >> To
checklist of images

docker build -t api . >> Build
the docker file
docker tag api:latest repoName/api:v0 >> Tag
the image
docker run -d -p 60639:80 api:latest —
environment="Development">> Run and containerize the image with port numbers under
multiple environments. -d is daemon mode (runs on the background), and -it is the interactive mode (we
can debug and check logs).
docker ps a >> To
checklist of running containers.

docker container stop/rm <container name or
id>>> To stop and remove the list of running containers
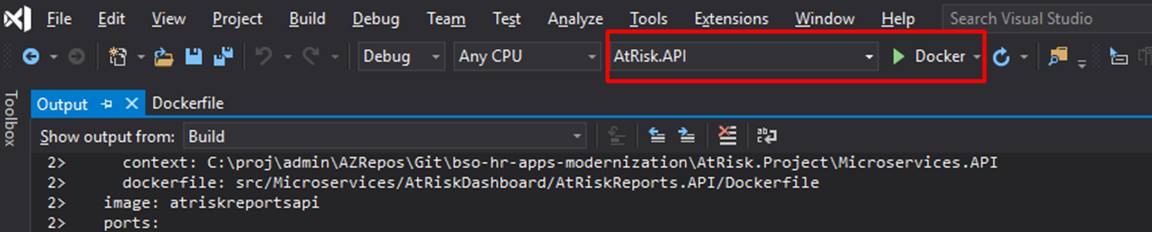
Either
we can run the Docker containers using the above
commands or we can execute through Visual Studio.
Run
the application with Docker as an option shown below:
Using
the container port, now we can invoke the API service in the same way we
approached for IIS Server.
Conclusion
Microservice
is a service built around a specific business capability, which can be
independently deployed and is called bounded context. This article on Microservices is focused on what Microservices
are and their advantages over monolithic services architecture. The article
describes a simple step by step on how to develop a Microservice
using ASP.NET Core and run it via IIS and Docker
container. Likewise, the service can have multiple images and can be run on
multiple containers at the same point of time and deploy to multiple
environments.
This
is just a simple article about creating micro-services using .Net Core. If
you have any questions about articles or content, please comment down to make
it better. Your comment matters to improve and share knowledge.
Thanks
and Happy Knowledge sharing !!